Customizing a motorcycle helmet has always been a fun activity. Feel free to paint this headgear with a custom design or add stickers and other embellishments. Design and decorate it in a way that your true personality gets depicted.
A fully decorated helmet stands out in the crowd. It automatically makes the riding time much more fun and exciting and also brings a ”cool vibe” to the rider.
Though features matter the most in a motorcycle helmet, how you personalize and embellish it matters equally. Here you can check out the guide on how to customize motorcycle helmets.
The common way is to paint it or add stickers, custom skins, or decals; the choice is all yours. You can think of more unique and creative customizations. Brainstorm as much as you can, think out of the box, and share with us your unique ideas.
Customizing a motorcycle helmet
No doubt, customizing a helmet is the best way to express your emotions, individuality, personality, and what level/kind of rider you are! Add catchy stickers, skins, and decals to give your helmet a unique look.
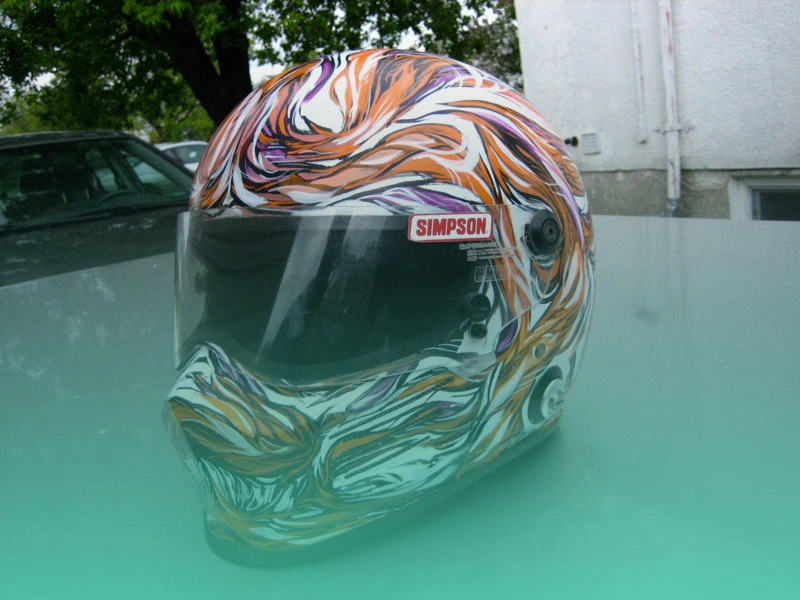
Paint it up!
The common way to give a personalized touch to your motorcycle helmet is to paint it up! Yes, you will find this activity a hell lot of an enjoyable and equally exciting.
First, think about the unmatchable and unbeatable design you want to paint. If you can paint on your own, that is great; otherwise, seek the services of a professional. Step by step guide on painting a helmet is mentioned below:
Step 1
The first step is to clean the helmet. The customization job can only be done successfully if you have thoroughly cleaned the headgear. Remove all excess dirt, debris, and grease, and ensure the surface is smooth.
Step 2
Once you clean it, remove the padding and screws or tape them up. You never know when paint stain comes on the padding. If it comes, it will be difficult to remove it later on. Removing the screws is also important. If paint comes on the screws, you cannot tighten them anymore. You might have to buy new hardware, so remove the padding and screws on a priority.
Step 3
Sand down the exterior side of your helmet. You must use quality sandpaper so that this step can be done quickly. Using 400-grit sandpaper remains recommended. It lets you create a smoothly finished surface, making the painting job easy.

Step 4
After you are done sanding the helmet’s exterior, the next step is to paint! Go slow if it is your first time painting the headgear. If you doubt your painting skills, you must hire a professional painter for this job.
Step 5
Let the paint dry for some time. Avoid putting it on your head until and unless the paint is completely dry. Wearing it too soon if the paint is still well-done leaves marks and smudges on the design.
Add decals and stickers
How about adding decals and stickers to your motorcycle helmet? Most of the riders are going crazy after this trend. They are continuously in search of eye-catching stickers. Remember that whatever decal and sticker you choose should be easy and effortless to apply. Furthermore, look for weatherproof embellishments. Below we have mentioned the step-by-step guide on how to attach decals and stickers:
Step 1
The very first step is to finalize the spot where you want to place the stickers. Experts have suggested putting up decals on the outer part. In this way, you can easily see with a helmet on, and visibility will not be compromised either. Placing the sticker on the outer part lets people look at your helmet both from the front and behind.
Step 2
After finalizing the spot, clean the helmet and let it dry properly. The general rule is that washing and thoroughly cleaning the headgear before conducting any customization job is mandatory. The sticker or decal does not get attached properly on dirty helmets. In addition, filthy and greasy helmets create air bubbles whenever you put a sticker.
Step 3
You can now apply the sticker! Start at the edges and work your way inwards. In this way, the sticker will not overlap or produce air bubbles.
Step 4
If you spot air bubbles or any kind of deformity, you can lightly apply the pressure onto the sticker and flatten the bubbles.
Add braids to your motorcycle helmet
Adding braids to the bike’s helmet has become the next ‘’big’’ trend. Multiple styles, shapes, and colors of braids and pigtails are available in the shops; choose any one of them.
In addition, such embellishments remain quick to apply and do not slip off in any case. They get attached with the help of suction cups so that no strain comes onto the helmet. Girls have become die-hard fans of this trend. You must have also spotted them on the road flaunting an artificial braid or pigtail with a helmet on!
Personalizing the helmet with a ‘’Mohawk’’ style
One does not doubt that the Mohawk style definitely makes the helmet the coolest looking. Uncountable Mohawk variety is in the markets; they come in many shapes and forms. You attach them onto your helmet via adhesive or suction cup. Flaunting a Mohawk-styled helmet will make you stand out on the road, and all eyes will be on you!

Adding ‘’cat ears’’ on the motorcycle helmet
The trend of adding ”cat ears” is similar; likewise, we have discussed the craze for pigtails, braids, and Mohawk. Cat ear embellishment is so easy to apply. They have a detachable design. Riders who have immense love for pets remain enthusiastic to personalize their helmets in such a way. These embellishments are extremely lightweight and do not put a load onto the helmet or compromise its structural integrity.
Add graphics onto the helmet
Adding graphics onto your helmet will give it a ”wow” look. The popular graphics you can definitely put on the headgear are lightning bolts and checker flags. Some love to emboss halo and reflective eagle graphics. Keep the size of the graphics one to three inches and not more than that.
Other accessory ideas for decorating the helmet
You can experiment as creatively and artistically as possible when giving a personalized touch to your helmet. Look for the accessories that show your personality and speak to you. Dozens of catchy accessories are in the shops; hunt them on a priority basis.
For example, you can attach traditional ties, bow ties, crowns and diadems, and animal horns. Please seek advice from a professional crafter; he knows exactly what embellishments and accessories will suit your helmet. Moreover, choose only those decorating pieces that maintain the visibility and helmet structure.
Bonus tip:
- The choice of customization matters the most! Putting too many embellishments and decoration pieces onto your motorcycle helmet is unnecessary. Follow the rule ”less is more,” and you are good to go. Adding more things will minimize the visibility and beef up the security. Go with options like glittery stickers and blinking lights; these are enough.
Why customize a motorcycle helmet?
One can think of many reasons why customizing a helmet is always exciting and fun.
- Personalizing the helmet makes it look unique and extraordinary. It improves the overall aesthetics, which is a plus.
- Extra protection element is there too! For example, you can paint the helmet by choosing a color that offers safety against UV rays.
- Customizing the visor gives maximum protection to the rider against bugs and flies.
- The cost of customization is much less. If you have a boring-styled helmet whose design has become outdated, you must customize that headgear right now.
FAQs
Conclusion
So, what kind of customized and personalized touch do you want to give to your helmet? Please share your ideas with us; we will be happy to hear from you. It is time to bid goodbye to dull-styled helmets and make them look electrifying by following the above-mentioned guide. Stay connected!